
Here is my finished project for EDCI 250, in answering my inquiry question: “How does classroom design and layout affect the social collaboration and behaviours of elementary students?“
Author: kaia
a colourful ending :)
As I was designing my last piece of jewellery, I aimed to end the term with an elementary-oriented necklace—full of colours and shapes! In planning a rainbow of colours, I sourced various elements (wood, glass, plastic) to incorporate as many finishes as possible, as light has a significant effect on our perception of colour! For example, wood is more matte than a glossy glass bead, so it will reflect less light and appear duller or darker. Once I created this eclectic collection of beads, I referred to my original sketched design for reassurance on my chosen materials.
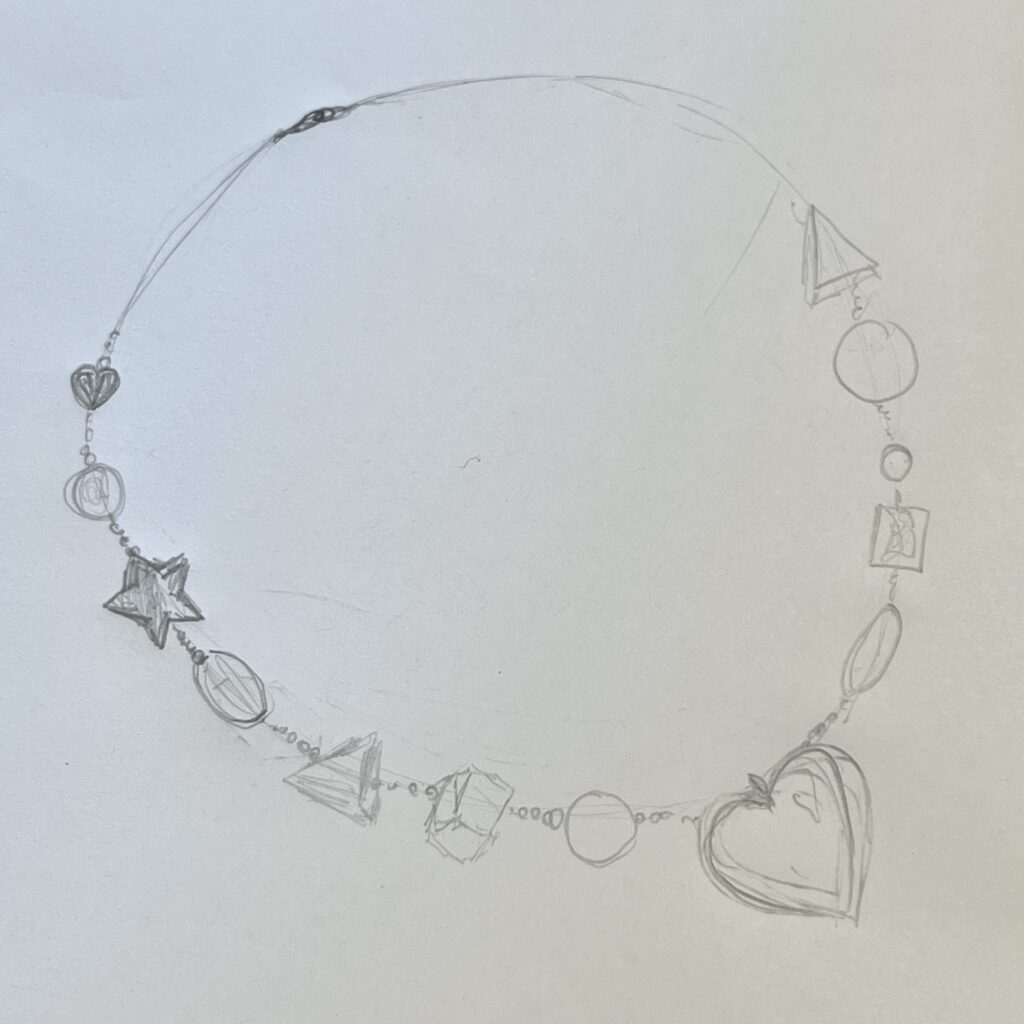
my rough sketch for this colourful necklace featuring seed bead separations and the primary shapes!
My original idea included an oversized heart charm as the centrepiece, which I sadly omitted as I could not find a yellow heart at any local bead shops. However, I can always add this imaginary charm later!
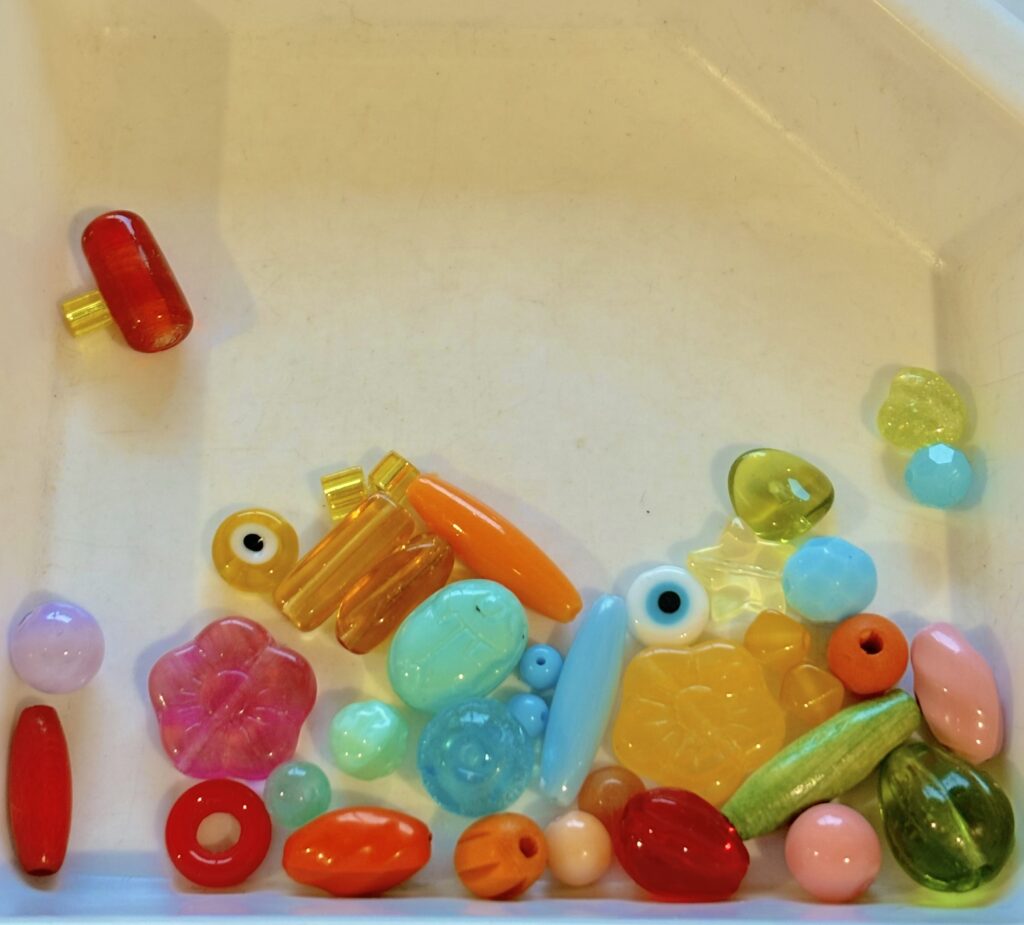
the various beads before organizing the pieces by colour—pink, red, orange, yellow, green, cyan, blue!
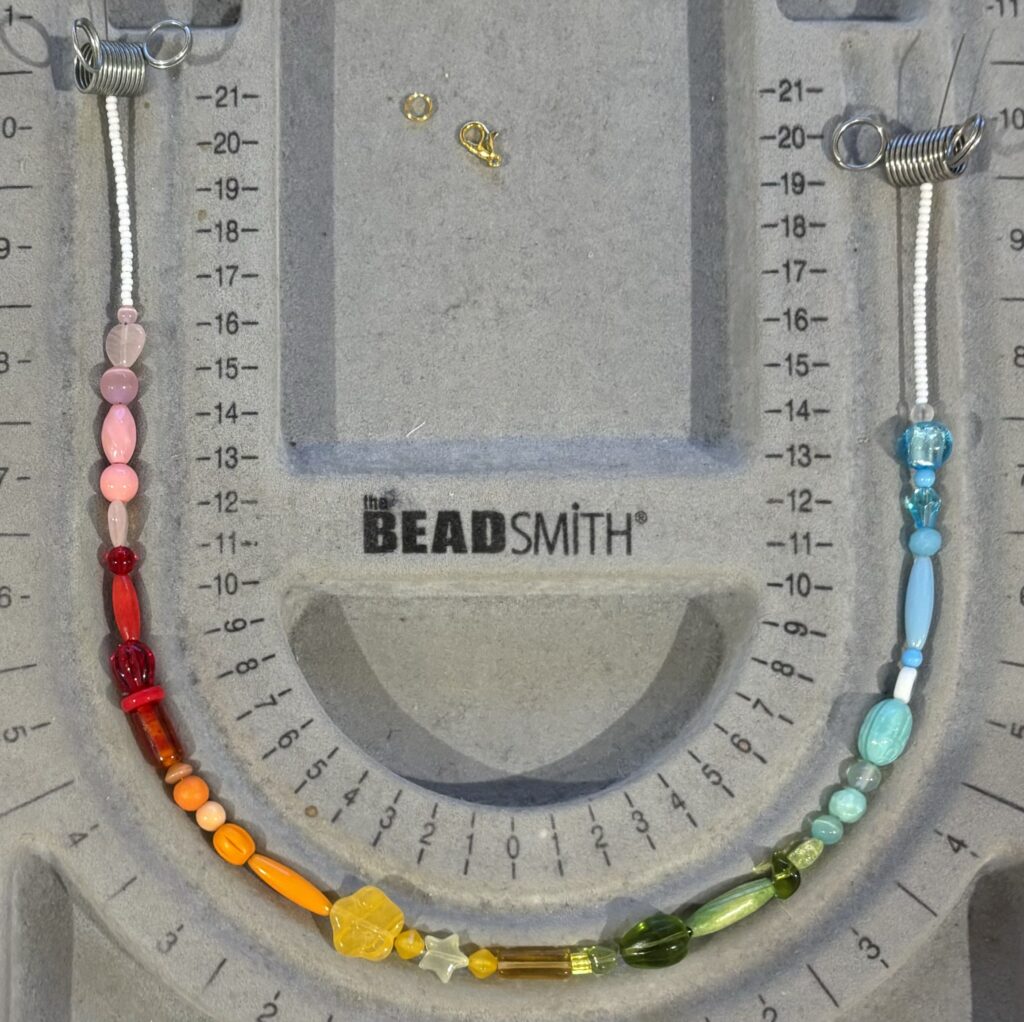
After separating the beads into separate collections of colours, I strung the beads fairly quickly with only minor changes throughout. While stringing the beads, I would select a few charms of different materials to go together, as this created the most contrast in each monochromatic section. I purposely did not blend the colours to create a gradient to accentuate the blocking for a childish appearance.
I almost forgot to photograph the process, so here is the nearly completed piece!
To emphasize the vibrant colours and varying shapes, I strung thirty white seed beads on either side of the wire to create a “frame” that highlights the hues. Playing with the shapes of each bead was interesting, as I was focused on depicting various general shapes to mimic my original sketch—even though the final product features much more complex shapes!

my last piece, finished! (…for now, as I hope to continue making jewellery outside of this course)
using games and technology in the classroom!
An experience I remember clearly with gamified learning and teaching was through a summer camp I had the opportunity to work with that offered coding, using Ozobots and tablets. These tiny robots were an amazing combination of creativity, hands-on learning, and technology, demonstrated through various interactive games!
The primary grade students were able to create removable “costumes” for their own robots using craft supplies such as coloured paper, googly eyes, and pipe cleaners! When the students were finished with this craft, there was a clear expression of individuality and personality through their adorable creations!
I unfortunately did not capture their particular costumes, so here is an example
Each student was given a tablet with a coding application to program their own pathways, mazes, and races, creating a map for their robots! Despite the young ages of Kindergarten to grade 3/4, these children created many elaborate and engaging paths using black, red, green, and blue markers. This colour-coding aspect was necessary for the Ozobots to use their sensors to accurately follow the lines. This detail was beneficial for motor skill development by teaching the students how to create an effective, useable map as you could not directly cross lines or have any gaps, as the mini robot may become lost. The younger students were provided with stickers displaying a particular code, while older students were encouraged to fill in white squares with the correct colour codes. This adaptation provided accommodations for the varying motor skills in the classroom.
here is an example of what an Ozobot map may look like!
The OzoBlockly programming offered a variety of reactions to the codes, displayed by the bot: light shows, timers, counters, speed, direction, celebrations, and the most popular effect: “Special Moves!” The students LOVED the ability to have their robots dance and spin around in the middle of their journey.
These little robots were a highlight of my experience with this camp, as they provided the students an outlet to learn coding in a tactile, gamified, and understandable way while implementing personalization and creativity!
snowman necklace & friends
I designed a complex necklace this week, using rings to connect three separate components to form a layered necklace! I sourced this adorable lampwork snowman bead, and aimed to feature him in a holiday piece along with some simple earrings. In contrast to last week, this “set” does not overtly match, though they are both themed for the upcoming Christmas season!
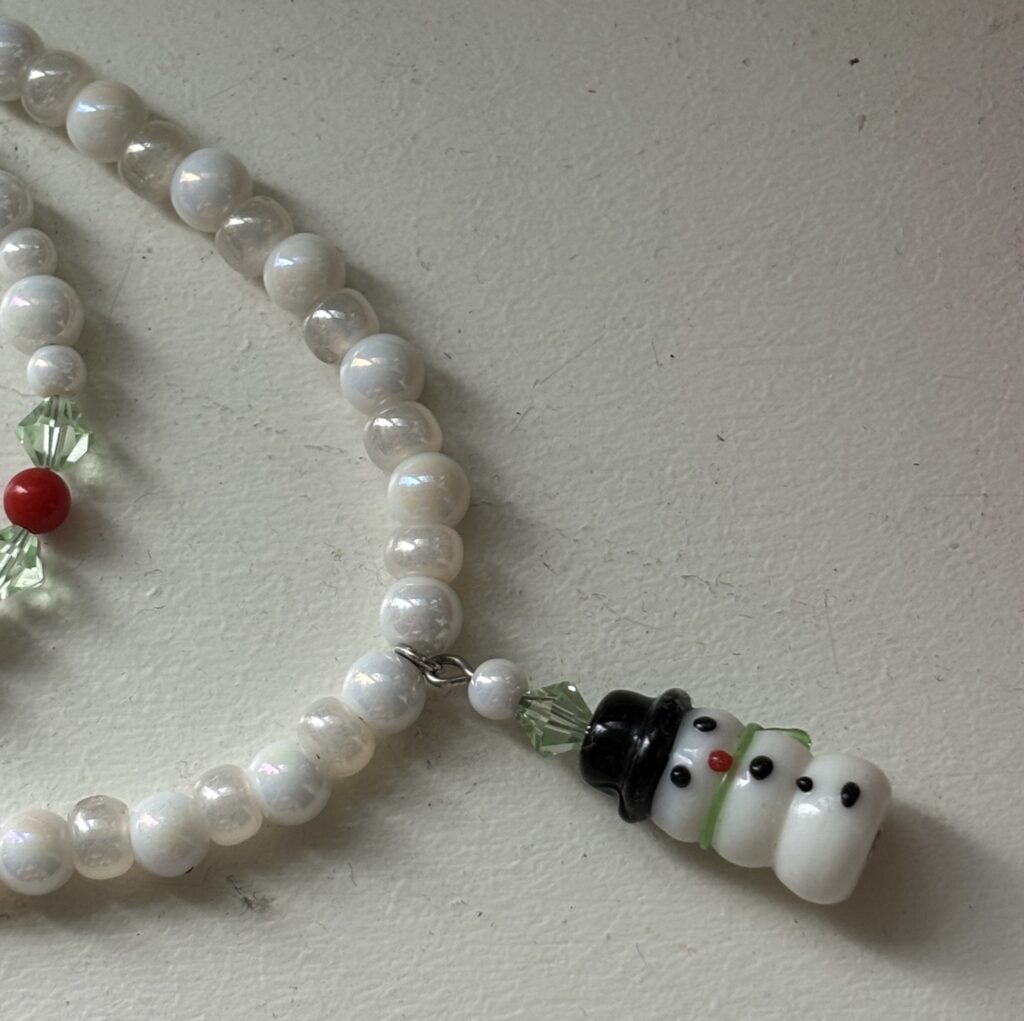
the snowman charm!
I began by sourcing white, red, and green beads of differing materials. I then measured and cut three pieces of jewellery wire of varying lengths. I chose two kinds of round beads to create a simple, monochromatic pattern to depict a snowy “background” for the centred charm. For this main string of beads, I used the green and red beads to make abstract arrangements of holly plants!
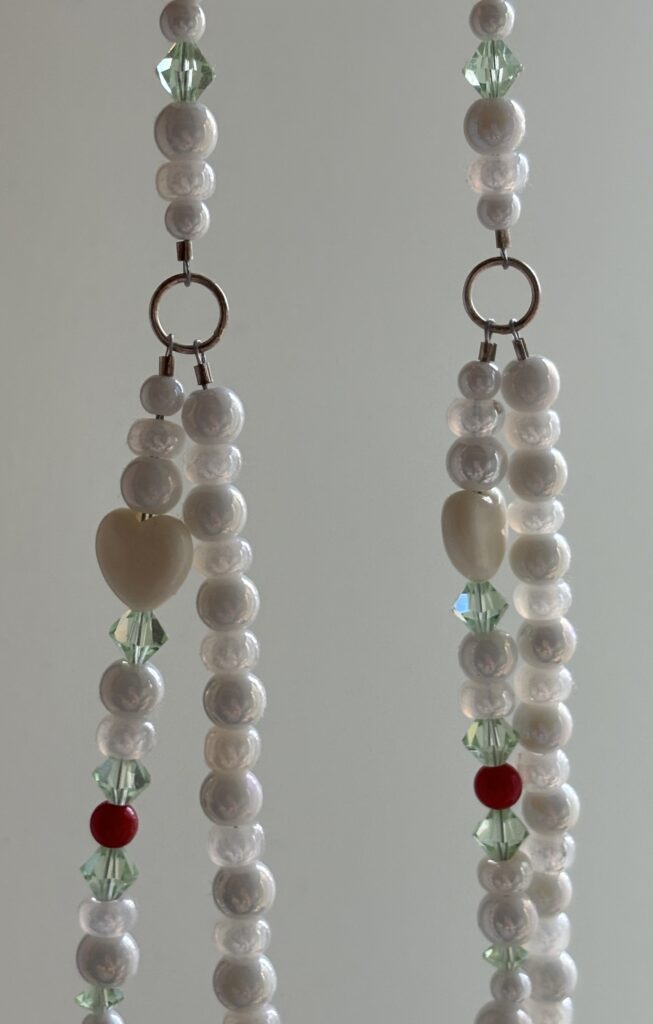
the linked pieces
After stringing each wire separately (the back piece and two layered pieces), I connected them with silver loops. I have avoided silver thus far, although I thought silver would be a better option for a snow-themed piece. If I were to recreate the necklace, I would opt for gold hardware to match the oversized earrings! I unfortunately did not capture any photos of my process as I spent a very long time attempting to attach the pieces—this was centainly a project I learned from.
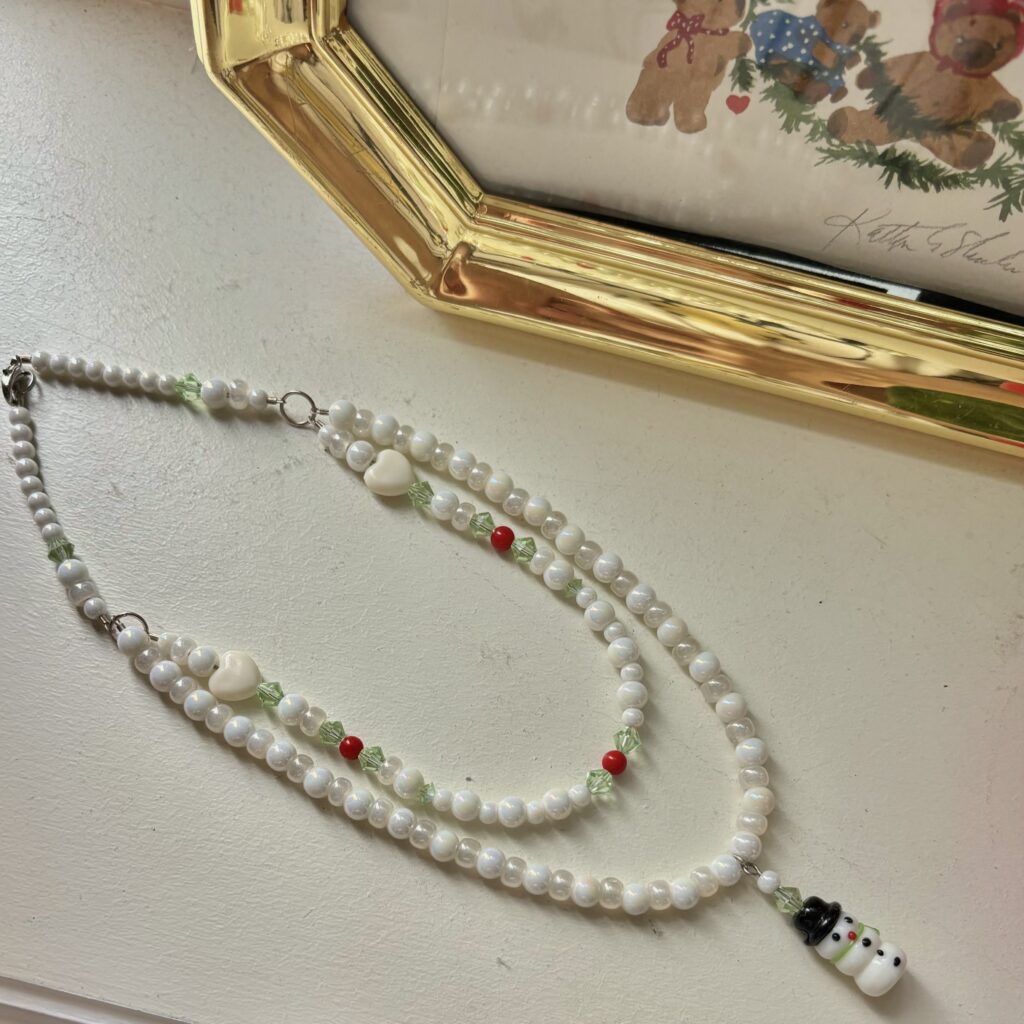
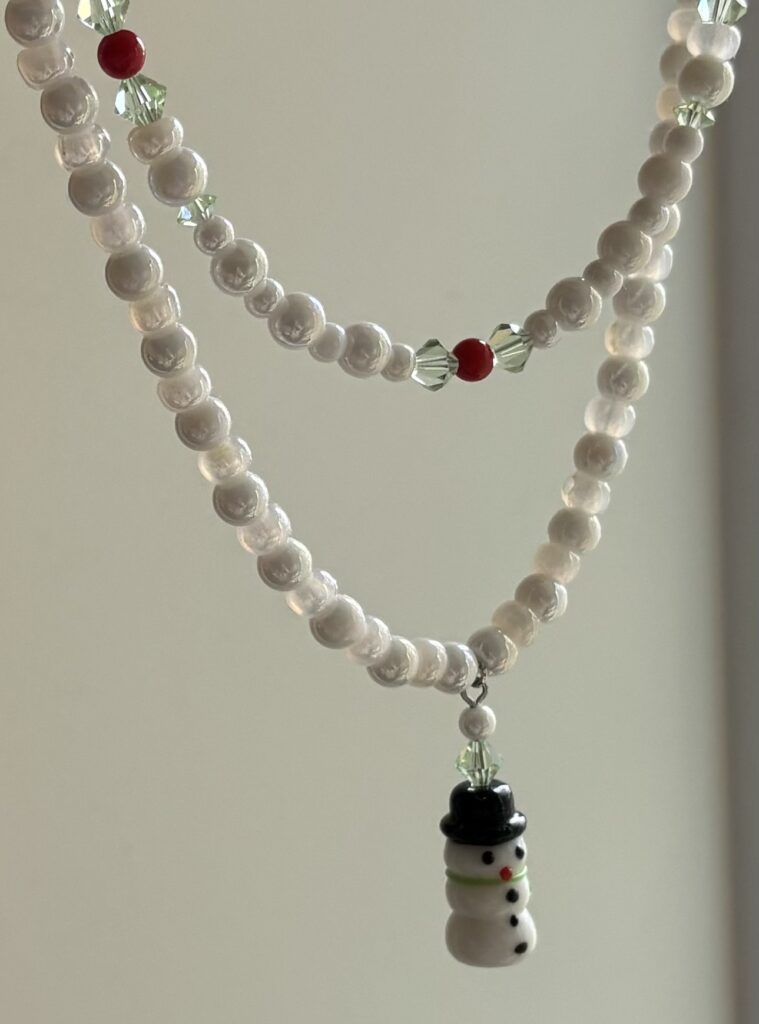
the finished necklace!
The earrings were much more straightforward to create than last week’s trio of beads and charms. I found these festive gold pendants portraying a Christmas tree and wreath at a bead shop and merely attached some matching hardware!
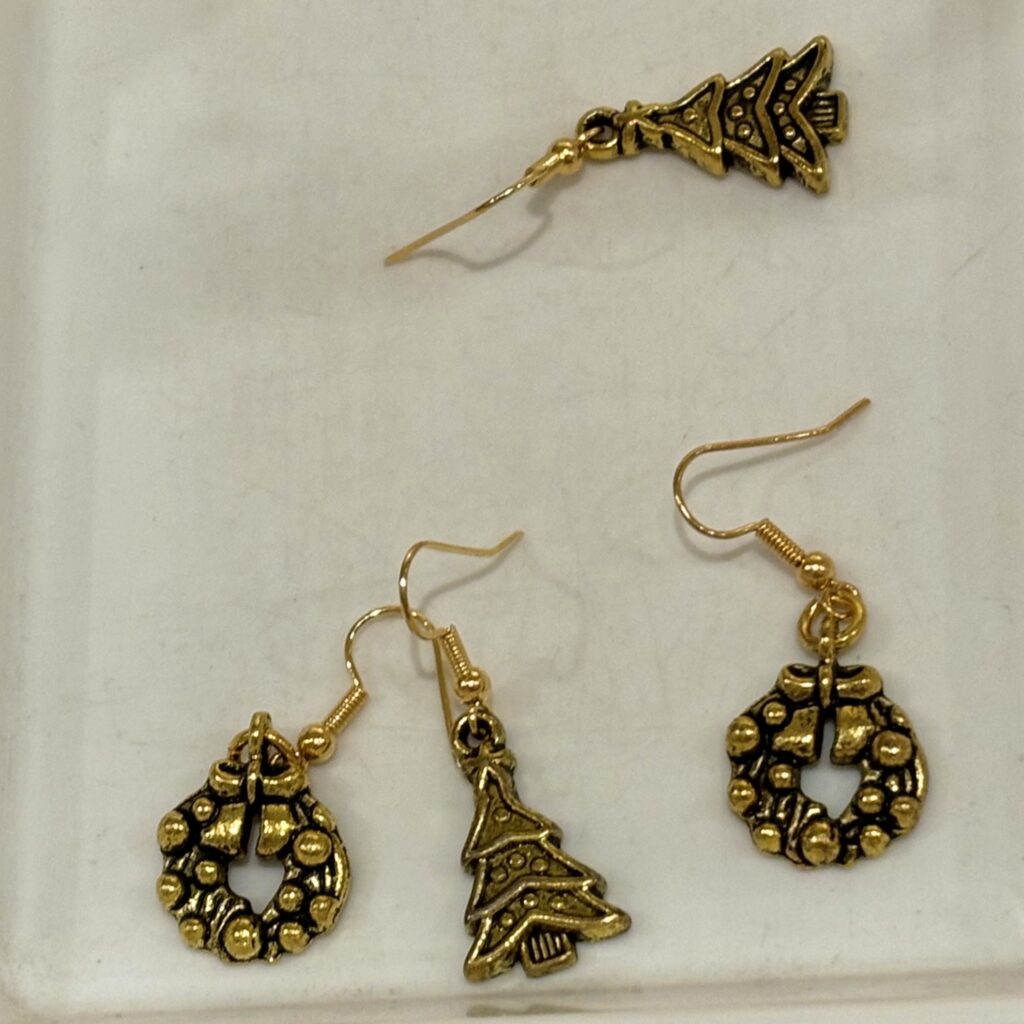
the earrings!
the connections between technology, identity, and inclusion
Today, our class had a warm, welcoming, and interactive presentation from two guest speakers about the connection with technology, identity, and inclusion in a classroom environment. The guest speakers were with BCEdAcecess. This organization serves neurodivergent students and kids with disabilities in British Columbia: “All kids deserve access to equitable education”.
The speakers implemented menti to encourage an interactive presentation, allowing everyone to express a few words on each subject. Before beginning the slideshow, they presented an expanded, authentic land acknowledgement, opening up a conversation about indigenous learning and identity. The collaborative platform allowed the class to discuss our identity using singular words such as “female, woman, white, white-privilege, educated, LGBTQ, daughter, sister, etc.”
This topic then led into the concept of intersectional identities, with the speakers stating: “[think of] intersectionality as a concept to think about our privilege and identities and how it affects others.” Followed with an enlightening sentiment: “Every child will come into the classroom with an ‘invisible backpack‘…[teachers, parents, and staff also carry an invisible backpack].” This empathetic idea of the “invisible backpack” served as a reminder of the saying: you never know what a person may be going through in their life. This is especially prevalent in elementary grades as students may not have the proper vocabulary to articulate complex feelings, physical pains, or issues in effectively learning.
The link between technology and inclusion was introduced with the reality of inaccessible technology in the classroom. The speakers outlined some issues surrounding this topic: technology/devices are always outdated, equitable access to tech is difficult for classrooms due to financial barriers, and there is no central “keeper of knowledge” at schools—no reliable source of information on how to properly use technology. There is also an apparent lack of communication from schools to home/parents—what’s going well, what’s not, and generally making sure the students are using the technology in a way that supports them. Overall, there is a clear lack of support for educators to equitably and efficiently supply all learners with high-quality technology in the classroom.
This discussion inspired me to research additional classroom resources on how to implement affordable, accessible tech for students. One example is to utilize headphones to offer a text-to-speech function during individual reading if a student has a learning disability such as dyslexia. All students, neurodivergent and neurotypical, deserve access to beneficial technology for meaningful learning and development. “We all have different strengths, so universal access allows for support for all kids.”
a cohesive collection!
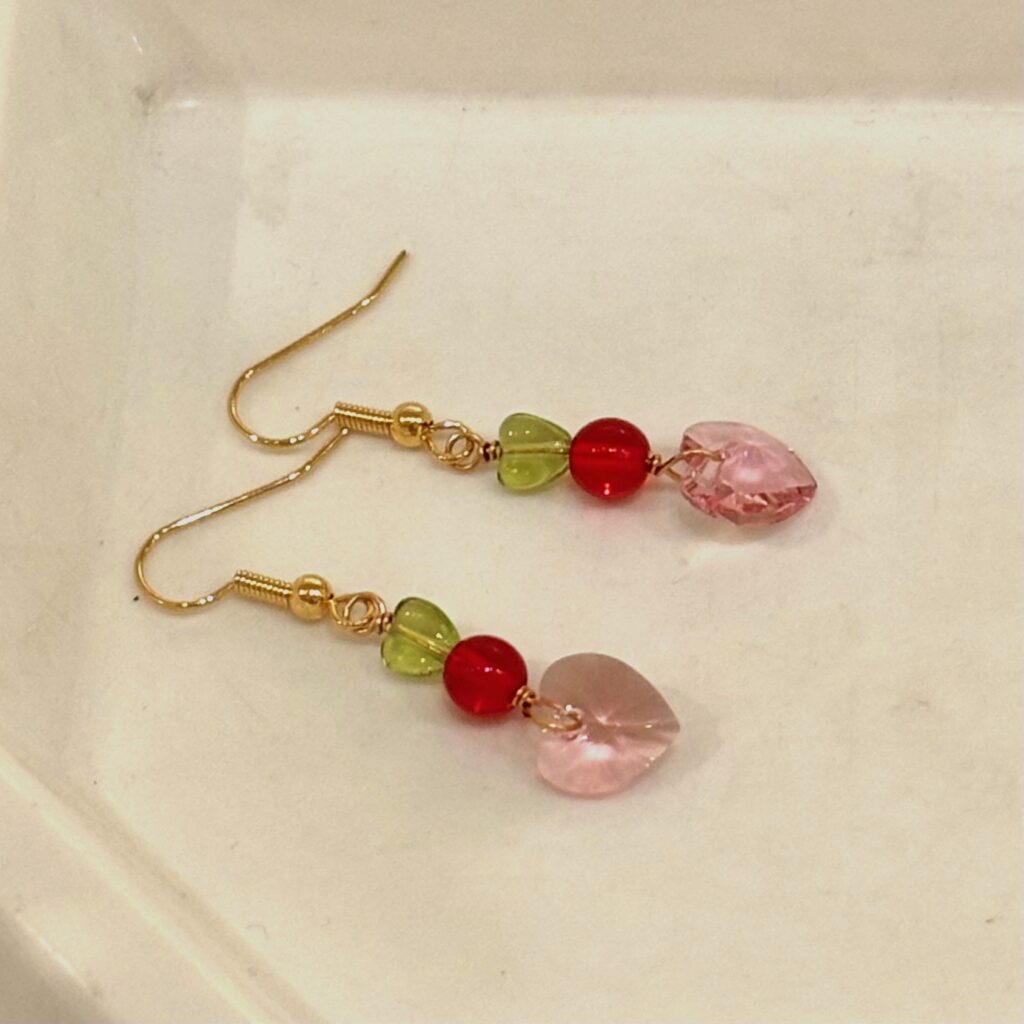
I finally made earrings! While stringing the beads on this week’s piece, I realized I had sourced some heart-shaped Swarovski beads that would be adorable with the necklace. So, I created some drop-style earrings with a cohesive colour palette to form a simple set.
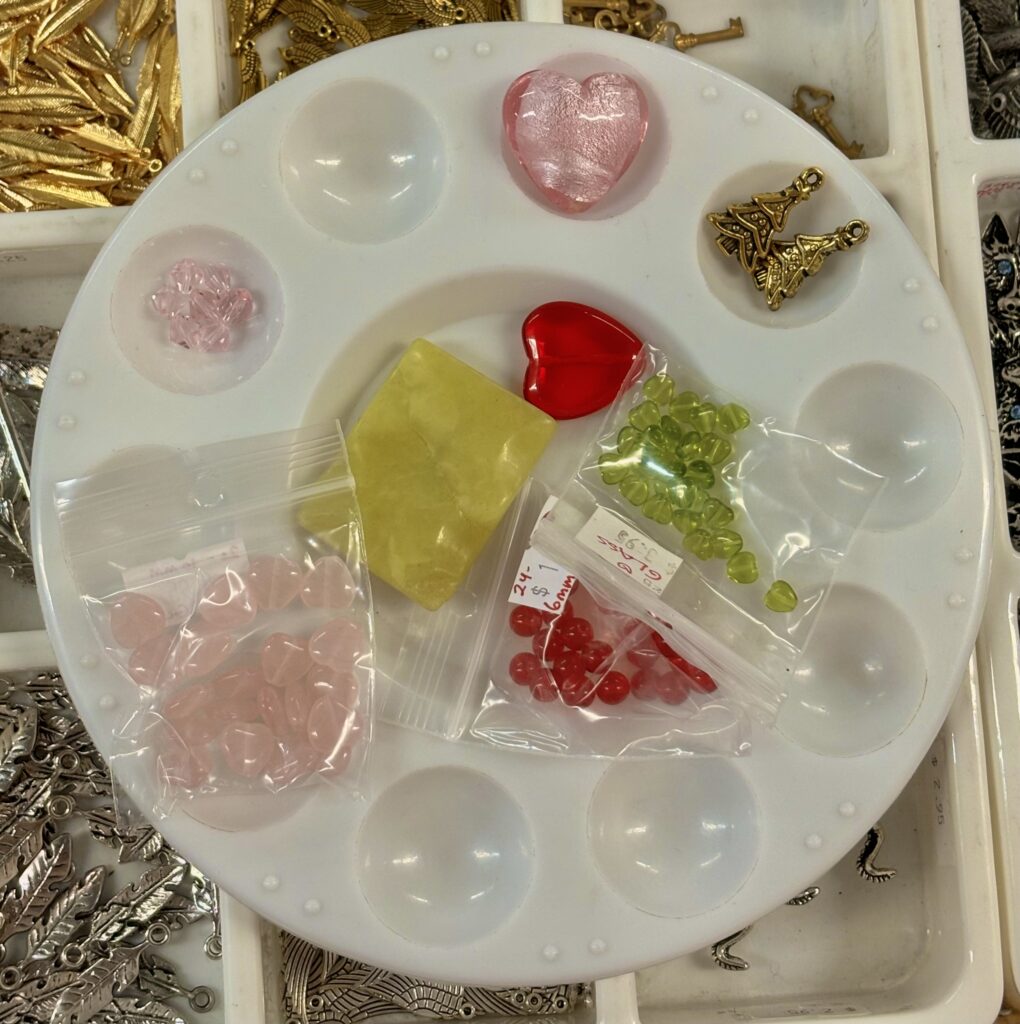
using the practical paint palette again! As you can see by the eclectic assortment, I had no clear plan for this project!
To begin, I took a trip to the local bead shop and collected various beads and charms. With no inspiration or style in mind, I knew I wanted to use more tedious tiny seed beads as I had many left over from my structured pink and green necklace!

(the small pot still looks this full!)
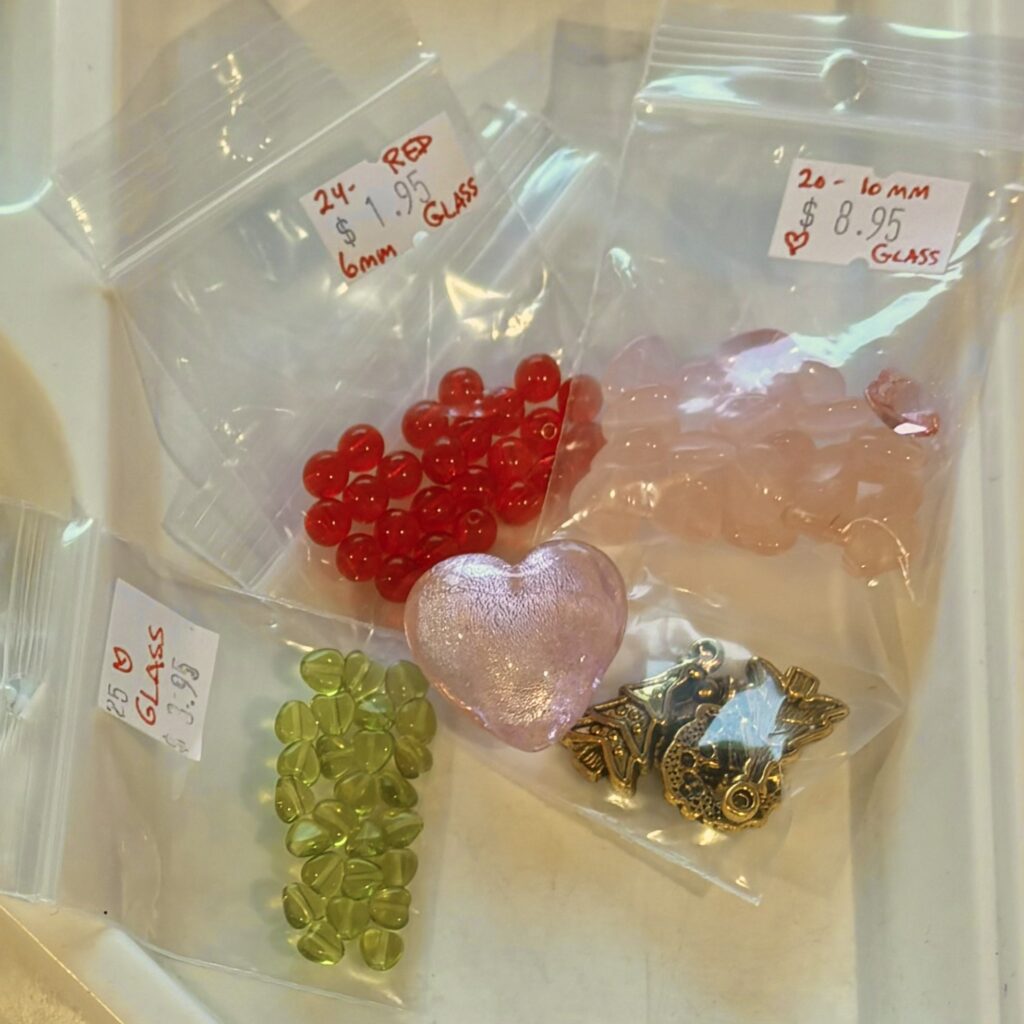
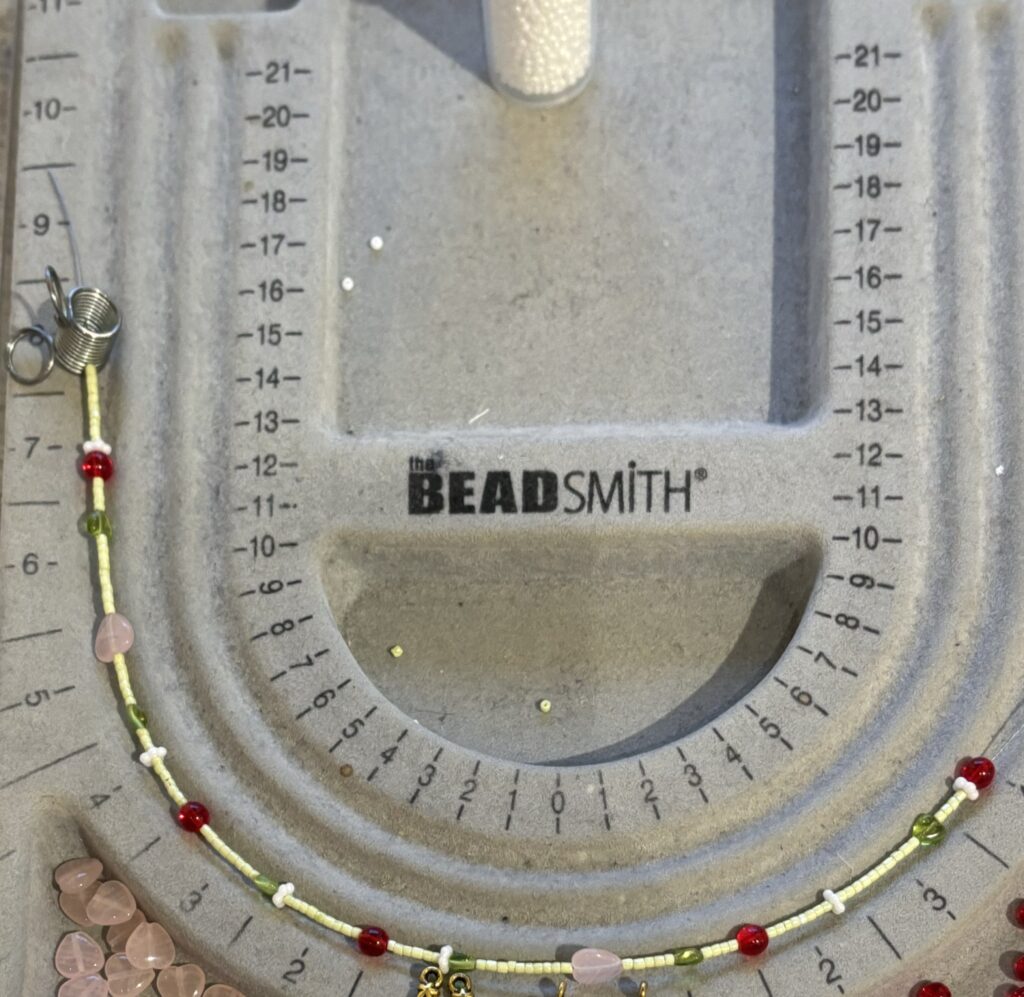
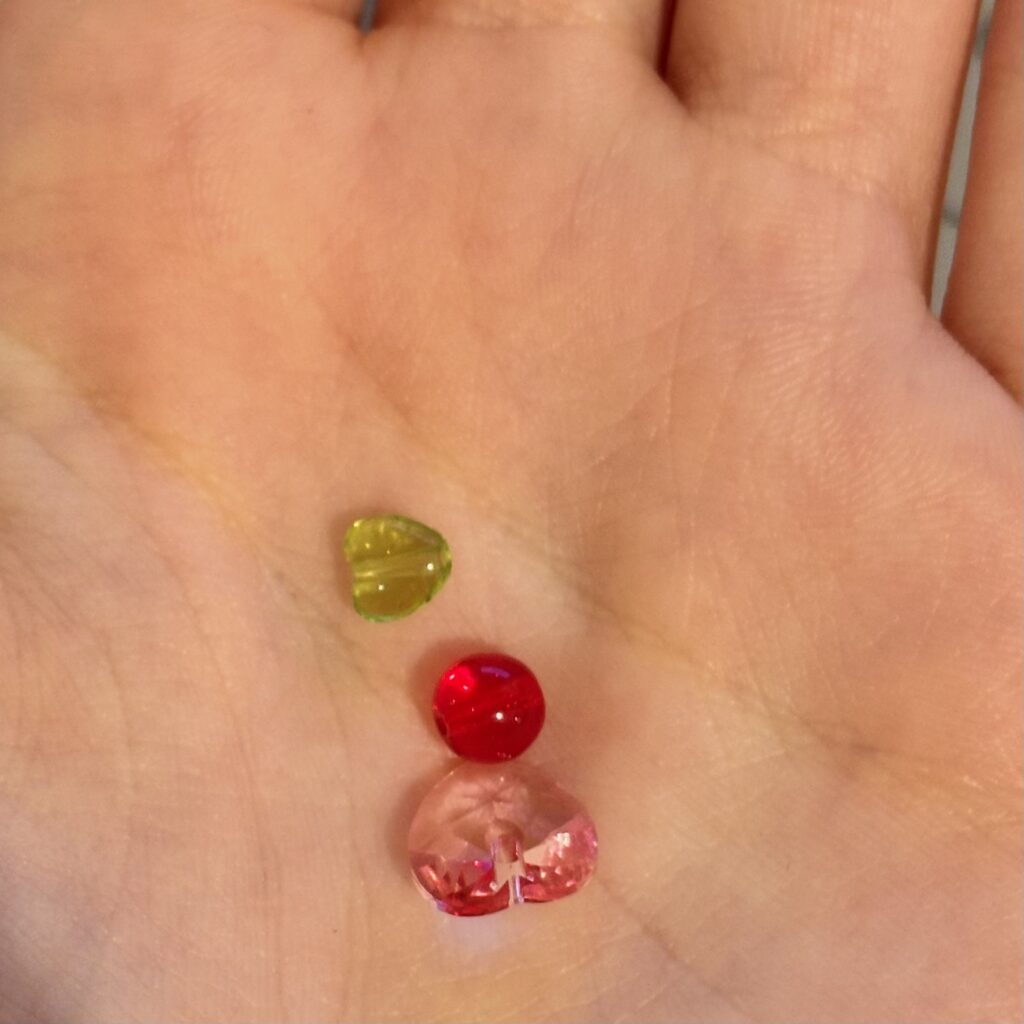
With the seasons changing, I wanted to mix this warm, pale green with pink, white, and red for a subtle holiday theme. I chose to work with rose quartz hearts, white resin flowers, red glass spheres, and green glass hearts to create a piece using mixed materials.
the process
I avoided counting the seeds to create a more organic layout while keeping a limited colour palette for cohesion. I also cut the wire to 42 cm to create a more fitted necklace to layer the piece with a charm necklace, such as the cat from last week! <3
before and after fabricating the simple earrings
To create the earrings, I designed a symmetrical stack of the mini green hearts and round red beads, featuring the pink heart crystals at the base. After sourcing gold hardware to match the necklace and lots of crimping and looping, I completed my first (successful) set of earrings!
This set was so fun to make as I did not design it before gathering the materials, and once I started stringing the pieces, I didn’t even have the thought to add or remove any beads! I would love to create an entire collection using these colours—possibly a bracelet and more earrings?
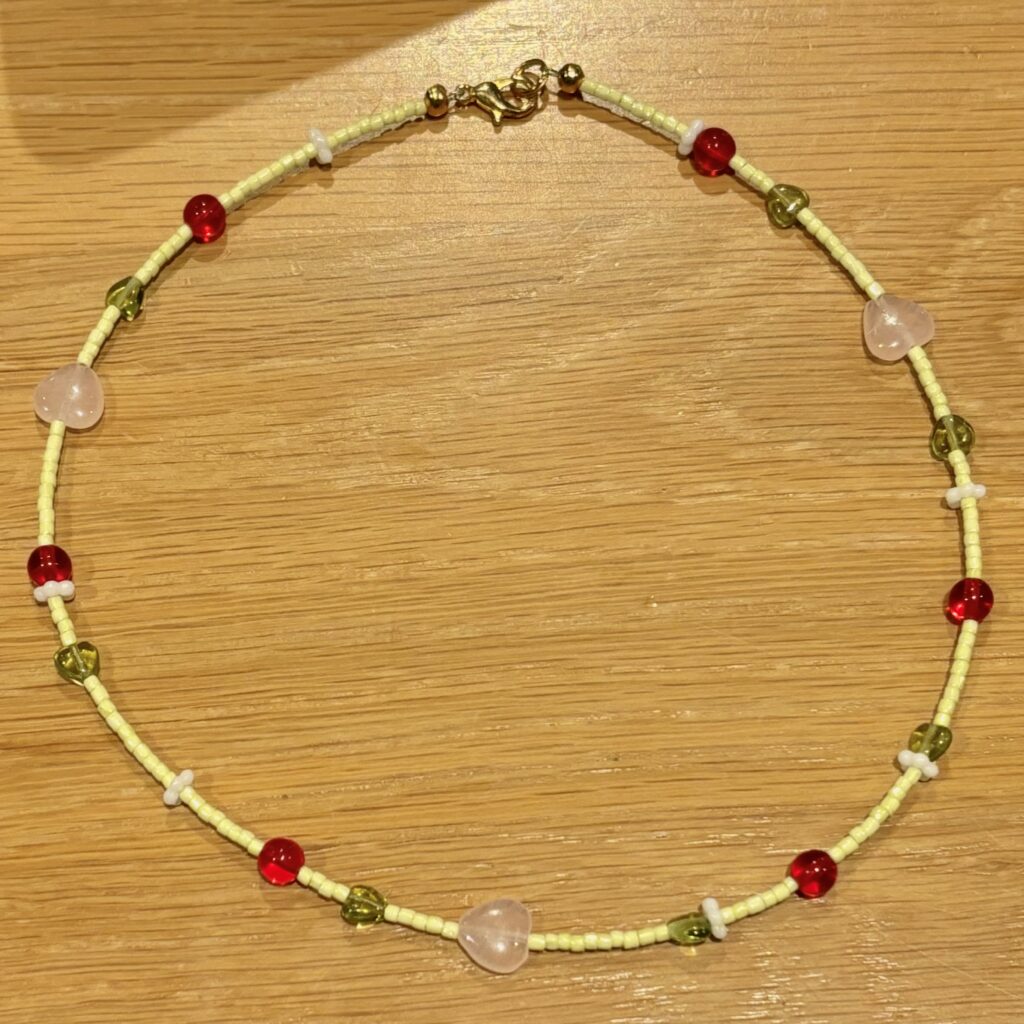
here is the necklace!
artificial intelligence in teaching & learning :)
The focus of this week was artificial intelligence in the classroom, and how AI platforms can be beneficial, or detrimental to teaching and learning.
We’ve learned throughout this semester that Chat GPT, in particular, can be a tool for educators and learners to use for guidance, entertainment, and to “focus on the process of learning and not just the product“—the last point can be difficult for users to grasp since this website generates answers and information in mere seconds. With this in mind, this free platform should never be used to cheat, and its information should not be taken and used as one hundred percent factual. These precautions are intuitive, but even so, I have avoided using Chat GPT until recently as our cohort has begun discussing its efficient and practical qualities for our future teaching careers.
I want to emphasize an interesting point that our professor outlined in today’s class: the importance of “celebrating humanness” and that AI cannot generate an authentically personal, human response. We should celebrate our opinions, interests, and perspectives in our teaching practices, as this is incredibly valuable and genuine for students to receive.
Thinking back to my initial experience with open AI, I was actually excited to experiment with the visual version: DALL-E! I absolutely love this platform when used respectfully. I love visual arts, but it can be difficult to visualize or conceptualize an image from my mind. It’s a great tool for defining artistic intentions and expanding your creativity. I would never have had the time to paint a small bear working with beads in oil paint (an adorable image I have used on this blog!), but I am so glad to have created that rendition with AI. Like the writing tool, I always try to use this website with respect and patience, always crediting the images it provides since there is a grey area in copyright for all AI-generated content.
To demonstrate my use of this platform, I asked DALL-E to generate a version of one of my favourite paintings, based on my prompt: “an abstract, colourful rendition of Claude Monet’s “The Water Lily Pond“, oil paint.”

This was not what I was picturing in my head, but this is such a cool adaptation of the original! It almost looks like small islands surrounding a waterfall.
This was super fun to play around with, though I am not yet this comfortable with its written counterpart! I hope to find more resources on how to effectively and meaningfully use these platforms as a teacher and learner in the future.
small business appreciation <3
This week, I wanted to highlight a small jewellery-making brand. The owner of Picnic Blanket Jewellery, Katie, creates her own adorable glass beads, from little guinea pigs to seasonal pumpkins! She describes her business as “Bespoke, handcrafted glass jewellery,” which I can agree with, as I love how none of the beads are the same due to their handmade qualities. Learning the process of lampworking and jewellery making in its entirety has made me view this craft with much more empathy and appreciation!

A few of her recent animal beads!
I ordered a matching set of handmade earrings and a pendant necklace depicting a little orange cat—view my “About Me” page for my adorable muse. I was happy to support a growing business while gifting myself these fine pieces. She often posts videos of her creations, which has inspired me to engage in additional research into the craft of lampworking beads. Luckily, she discloses this process on her shop’s website: “Each lampwork feature bead takes up to half an hour to delicately form by hand in the flame and reaches temperatures up to 800°C, before heading to soak in the warmth of the kiln for over 6 hours where the annealing process strengthens and ensures longevity of the finished bead. Once cooled, the beads are then carefully removed from the mandrels which they were formed on. They are then individually washed, reamed, cleaned and polished all by hand, before moving to the studio bench where they are crafted into finished pieces, with the total process taking 2 days to complete from start to finish.”
here is the same necklace that I ordered from her. I particularly love the small gold spheres throughout the gold-filled chain!
There are many more beads listed in her shop, included in various seasonal collections, bracelets, earrings, and custom pieces where you can submit photos of your pet for her to design and create as a charm!

these are the earrings I ordered!
While I do not wear the sizeable earrings often, I find myself regularly wearing the charm necklace in combination with one of my own beaded creations. I am sure I will be purchasing more pieces from her and other creative sole proprietorships in the future.

Thank you for reading this appreciation post <3
jewellery comes in all shapes and colours!
After working with last week’s charm, I began thinking of ways to create something out of much larger beads than I am typically comfortable with. In sourcing larger materials, I found a shop that offered semi-precious stone beads of various shapes and sizes! They displayed some pieces using grape-like stones throughout.
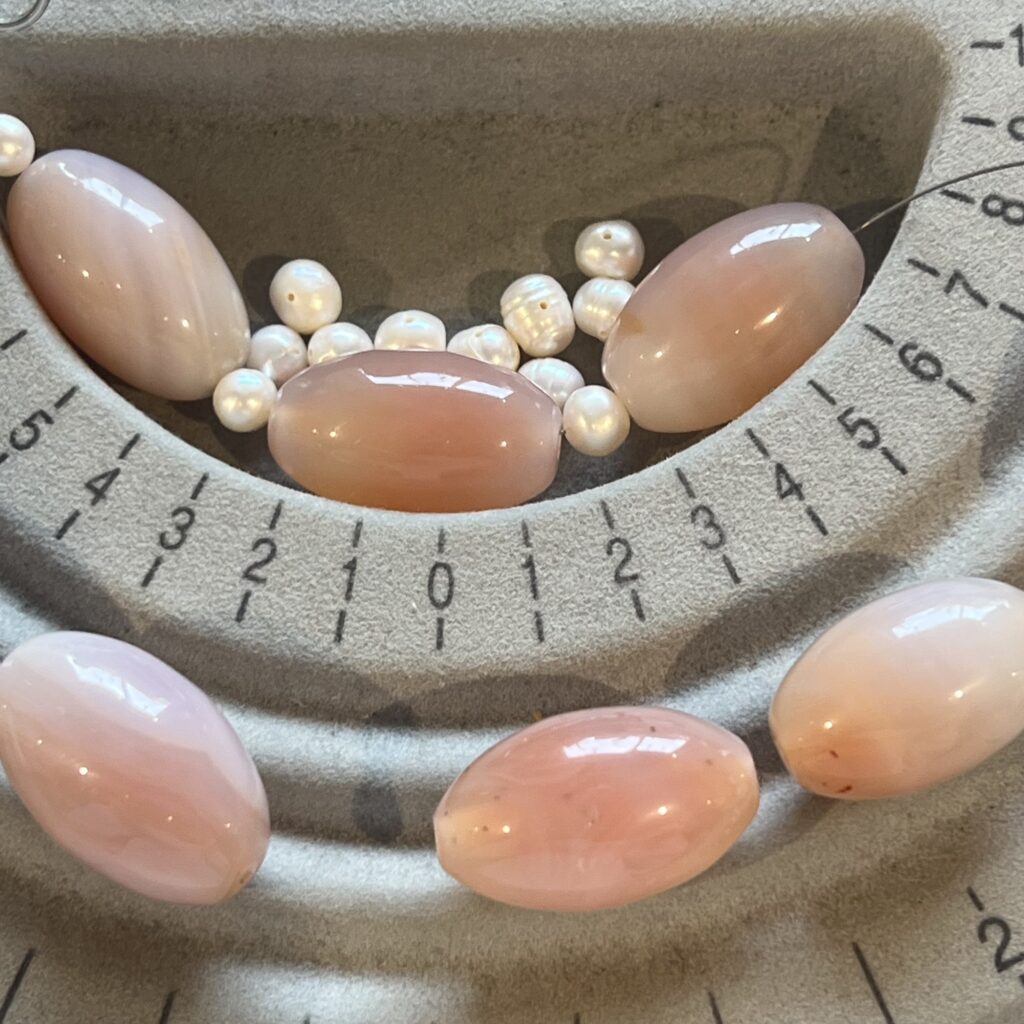
the “grapes” in question…
While I do not have a picture of these necklaces, they look similar to the one I created—but in black, red, and blue variations! I tried on one of the oversized necklaces for fun, and realized I appreciated the fruit-sized stones. However, I was so used to small, dainty necklaces that wearing such a heavy necklace felt odd.
this thought made me want to create a piece with the giant beads even more, as this feeling reminded me of a poster I have in my home <3
I measured how many large beads I would need and bought enough round glass beads to fit between them. While stringing the necklace, I realized that I wanted a higher contrast between the stones and supporting beads. To fix this, I picked out some irregularly-shaped pearl beads to go between the “grapes” instead.
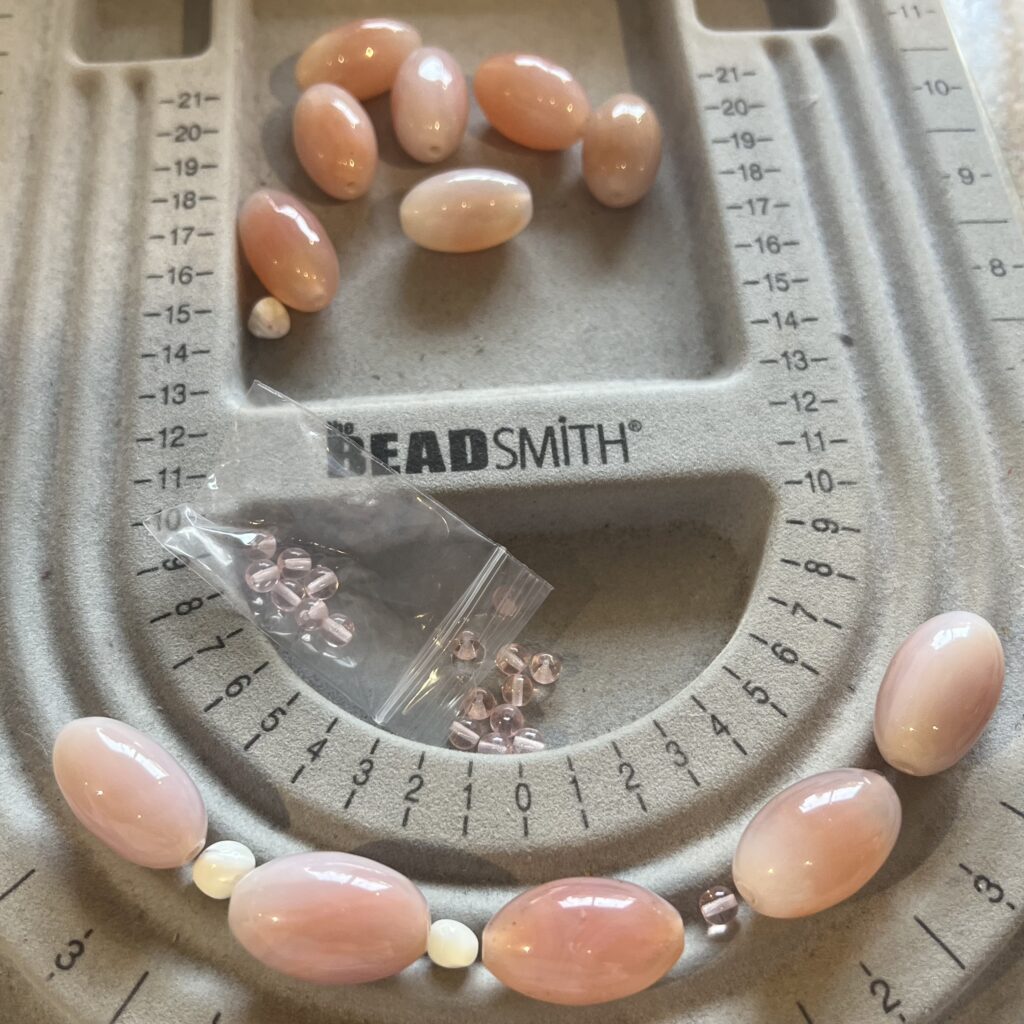
(replacing the supporting beads)
This was probably the quickest necklace I have ever created. The only hiccup was the alternating beads, but I finished it in about 10 minutes! I cannot say I have worn it every day, but it’s nice to have a different piece in my jewellery collection. One that isn’t very dainty and made out of primarily glass beads! I can see this necklace in many different colours, and I love how the beads are semi-precious stones, as they all have their own natural pattern!
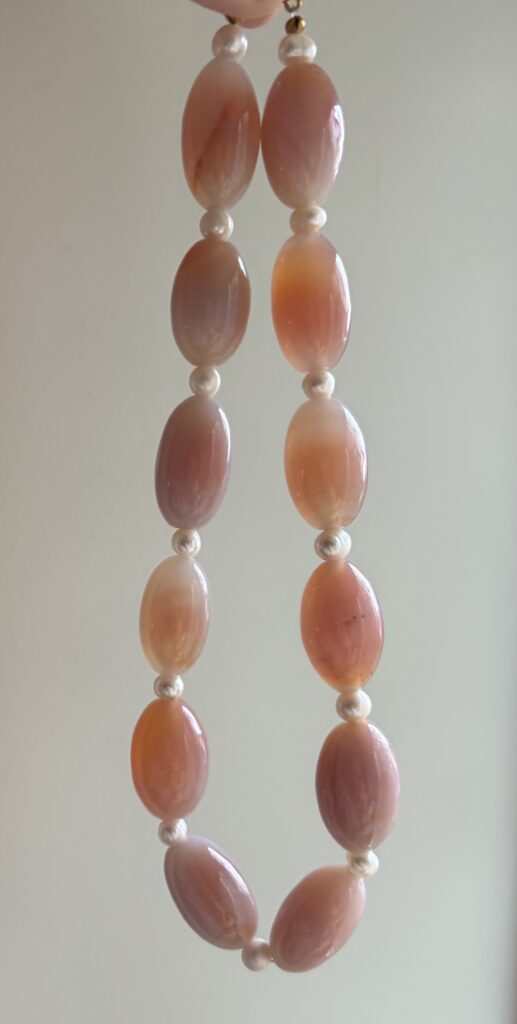
held up to the sunlight, you can see their unique details!
repurposing broken jewellery
A few months ago, while visiting the shops of Old Montreal, I came across an unusually large glass bunny sitting atop a silver ring. While this oversized charm wasn’t something I usually gravitate towards, I loved the handmade quality of this imperfect piece.
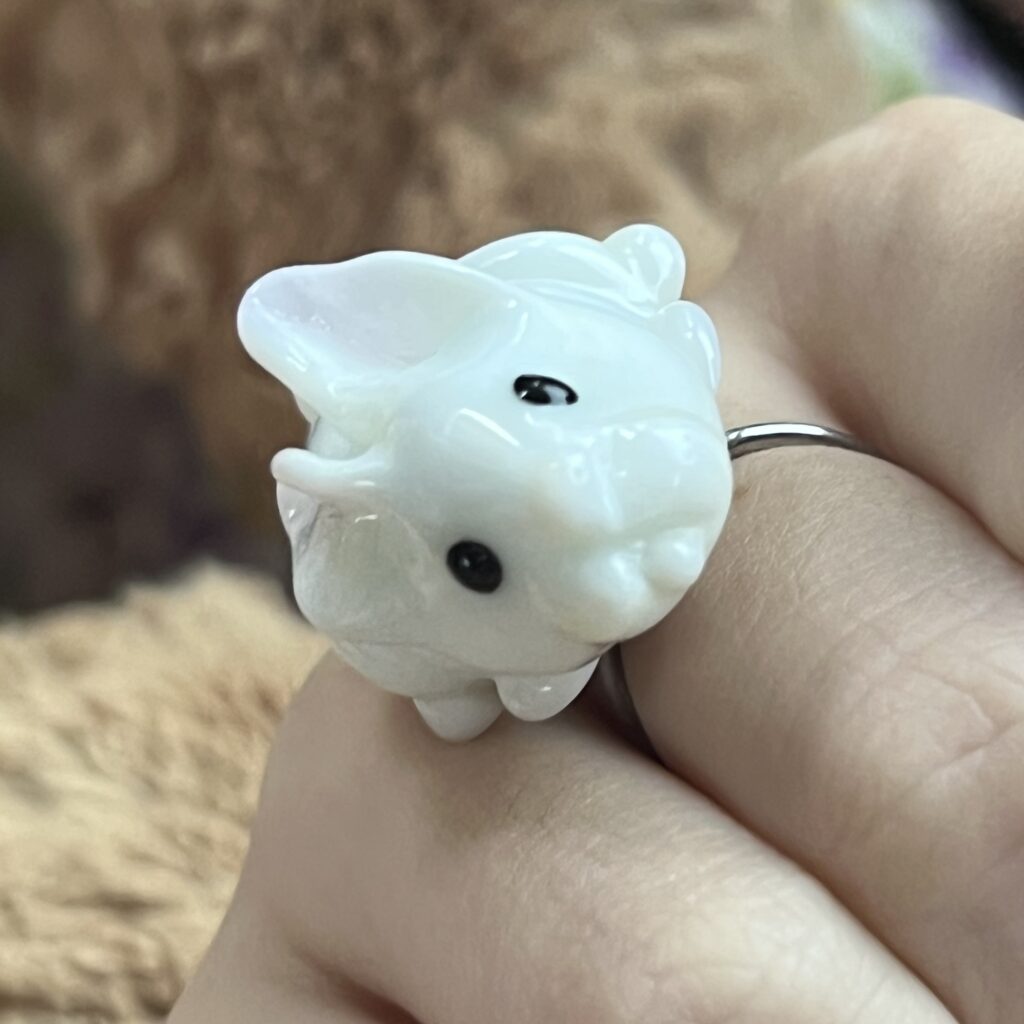

the bunny ring!
After wearing the ring for a few weeks, it broke off the sterling silver band, releasing the charm from the dried glue. It felt bittersweet since I was sad that it had broken, but I also struggled to comfortably wear such a heavy, unconventionally-sized ring in the first place.
So, I immediately began thinking of how to reuse the adorable piece, since the bunny itself was still intact! I always aim to encourage repurposing, reusing, and recycling, especially with an adaptable craft such as jewellery making, so this was another opportunity to do so. As I mentioned in previous posts, you can make a bead out of almost any material!
photo by clever sparkle on Unsplash
Restoring this piece was much simpler than I had envisioned. I was worried at the thought of having to somehow drill into the glass to connect the charm to a chain. A bead shop owner told me that I could instead use E600 glue to attach a flat bail at its mouth so it would hang facing me! I took this amazing advice, chose some gold hardware, and let the permanent glue set for a few days. Finally, I compiled everything to create a necklace featuring the bunny as the centrepiece.
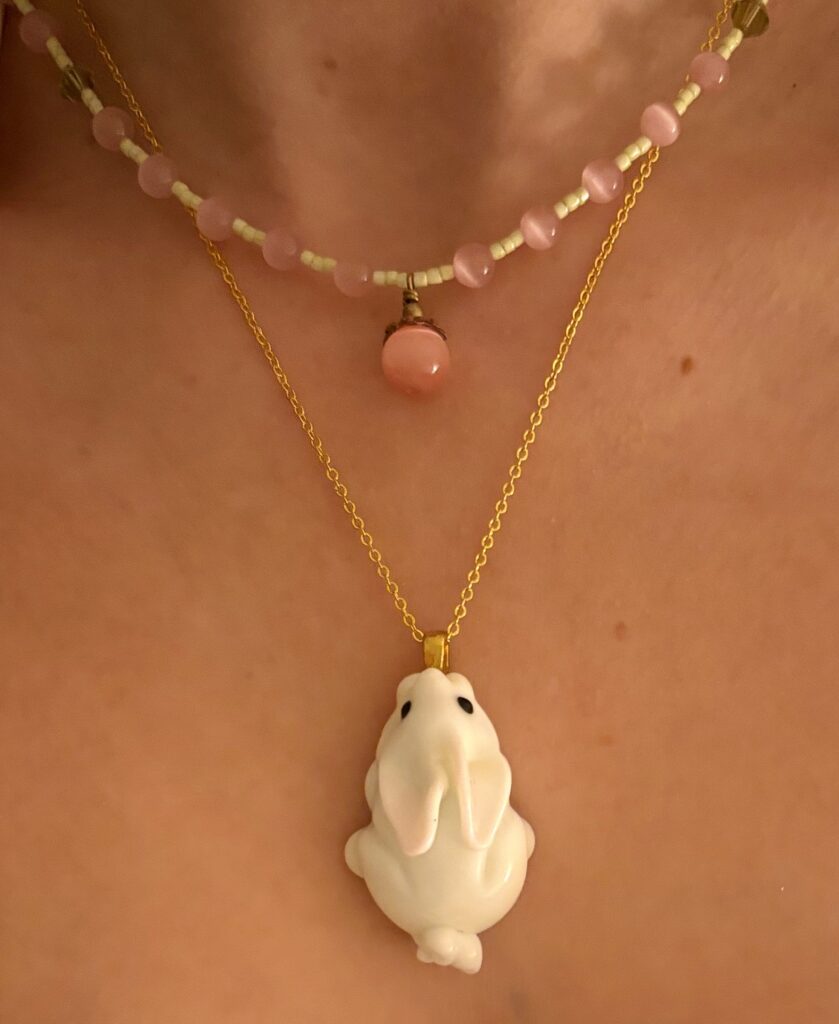
here is the bunny as a necklace!